2018-06-01

MySQL Cluster 7.6GA in the Cloud: the RPM/YUM platform

In this series of blogs I will do my best to demonstrate how to set up and run Cluster in Cloud environment by hand and by utilizing MCC. For detailed configuration, I will use MCC (Auto-installer). Some of the information regarding this setup is provided in post by Mikael. Information regarding Auto-installer is available in our documentation, HTML help files in share/MCC distribution directory and in my blog post.

Cloud setup

It might come as surprise but for initial testing any instance should do. I started with 1CPU/1GB RAM ones. The target topology was:
  • Host #1: Management node and Cluster client tools.
  • Host #2: Multi-threaded DATA node.
  • Host #3: Multi-threaded DATA node.
  • Host #4: SQL node (MySQL server)/API node.
  • Host #5: SQL node (MySQL server)/API node.


Cloud instances:
At your provider of choice, set up topology as described. Most of the providers prefer using keys so set the security and save the key to your local box. After that, set the firewall rules. Here is the list of ports with explanation for this example:
  • Port#1186: Port used by management node for communication. It is also used by MCC to connect to Management node host and gather status from/shut down the Cluster. Open it on host #1.
  • Port#11860: "ServerPort" used by DATA nodes to communicate with each other. Open it on hosts 2 and 3.
  • Port#3306: Standard MySQL server port. You need to open it on hosts 4 and 5.
To open ports via script, please check Mikael's post.
GOTCHA: Port 3306 on hosts 4 and 5 could already be taken by existing MySQL server installation which you might remove first or change this port to, say, 3316.
$ sudo netstat -tulpn | grep LISTEN
tcp        0      0 0.0.0.0:22              0.0.0.0:*               LISTEN      929/sshd
tcp        0      0 127.0.0.1:25            0.0.0.0:*               LISTEN      894/master
tcp6       0      0 :::3306                 :::*                    LISTEN      983/mysqld
tcp6       0      0 :::22                   :::*                    LISTEN      929/sshd
tcp6       0      0 ::1:25                  :::*                    LISTEN      894/master
$ sudo /sbin/service mysqld stop
Redirecting to /bin/systemctl stop mysqld.service
$ sudo netstat -tulpn | grep LISTEN
tcp        0      0 0.0.0.0:22              0.0.0.0:*               LISTEN      929/sshd
tcp        0      0 127.0.0.1:25            0.0.0.0:*               LISTEN      894/master
tcp6       0      0 :::22                   :::*                    LISTEN      929/sshd
tcp6       0      0 ::1:25                  :::*                    LISTEN      894/master

GOTCHA: Usually, MySQL Cluster DATA node will look for available port and auto-assign ServerPort. However, it is most likely that your Cloud firewall will block everything but specific ports so this value is needed.
If you have localhost deployment or you have two or more DATA nodes on same host, do not assign this value.

After dealing with security and choosing your preferred OS, make note of both public and private IP addresses. Public one we will use to control the processes from MCC while private ones will be used by processes for inter-communication bypassing DNS service:

NOTE: The "Open..." refers to "OpenFirewall" field of Host configuration.

Preparing the host(s)

If you're using MCC, you can configure all the processes and options and create directories/deploy configurations by clicking DEPLOY button on last page.
If you want to do things by hand, please, in your HOME, prepare the directories:
mkdir ndb (or MySQL_Cluster)
cd ndb
mkdir data
cd ..
Place the config.ini file in MGMT node(s) DATADIR you just created (~/ndb/data), place my.cnf in DATADIR on hosts 4 and 5. I will talk of config.ini more later.

Prepare the utilities:
sudo yum update
sudo yum install curl wget unzip zip
Get the RPM and extract:
wget https://dev.mysql.com/get/mysql57-community-release-el7-11.noarch.rpm
sudo rpm -ivh mysql57-community-release-el7-11.noarch.rpm
Check things:
rpm -qa | grep mysql                              mysql57-community-release-el7-11.noarch
The default values in MySQL repository file enable MySQL server but we need Cluster so change "enabled" value using your favorite editor:
cat /etc/yum.repos.d/mysql-community.repo
[mysql57-community]
name=MySQL 5.7 Community Server
baseurl=http://repo.mysql.com/yum/mysql-5.7-community/el/7/$basearch/
enabled=1 <<<<< 0
gpgcheck=1
gpgkey=file:///etc/pki/rpm-gpg/RPM-GPG-KEY-mysql

[mysql-cluster-7.6-community]
name=MySQL Cluster 7.6 Community
baseurl=http://repo.mysql.com/yum/mysql-cluster-7.6-community/el/7/$basearch/
enabled=0 <<<<< 1
gpgcheck=1
gpgkey=file:///etc/pki/rpm-gpg/RPM-GPG-KEY-mysql
or by issuing:
sudo yum-config-manager --disable mysql57-community
sudo yum-config-manager --enable mysql-cluster-7.6-community
Make sure everything checks out:
cat /etc/yum.repos.d/mysql-community.repo
[mysql-connectors-community]
...
[mysql57-community]
name=MySQL 5.7 Community Server
baseurl=http://repo.mysql.com/yum/mysql-5.7-community/el/7/$basearch/
enabled=0
gpgcheck=1
gpgkey=file:///etc/pki/rpm-gpg/RPM-GPG-KEY-mysql
...
[mysql-cluster-7.6-community]
name=MySQL Cluster 7.6 Community
baseurl=http://repo.mysql.com/yum/mysql-cluster-7.6-community/el/7/$basearch/
enabled=1
gpgcheck=1
gpgkey=file:///etc/pki/rpm-gpg/RPM-GPG-KEY-mysql
Installing Host#1 for the NDB management server is now easy:
sudo yum install mysql-cluster-community-management-server
To properly stop MySQL Cluster or to play with it from MCC, you will need ndb_mgm client so you can poll for status and execute various commands:
sudo rpm -ivh http://dl.fedoraproject.org/pub/epel/7/x86_64/Packages/e/epel-release-7-11.noarch.rpm
sudo yum install mysql-cluster-community-client
ndb_mgm --ndb-connectstring=172.31.24.27:1186
ndb_mgm> show
Cluster Configuration
---------------------
[ndbd(NDB)]     2 node(s)
id=1 (not connected, accepting connect from 172.31.22.116)
id=2 (not connected, accepting connect from 172.31.19.15)

[ndb_mgmd(MGM)] 1 node(s)
id=49   @172.31.24.27  (mysql-5.7.18 ndb-7.6.3)
...
Note: Perl is needed to install MySQL Cluster community package. To install Perl we need access to the EPEL packages.

Installing the NDB data nodes on Host#2 and #3 is also very easy:
sudo yum install mysql-cluster-community-data-node

MySQL Cluster server package depends on Perl which is not part of a standard Red Hat installation. So on the Host#4 and #5 used for MySQL Server we first need to install support for Perl by installing EPEL packages (Extra Packages for Enterprise Linux) much like we did for MGMT node host (#1). This is performed through the command:
sudo rpm -ivh http://dl.fedoraproject.org/pub/epel/7/x86_64/Packages/e/epel-release-7-11.noarch.rpm
You might need to check which package actually exists.

After installing this, it is straightforward to install the MySQL Server package. This package will also download the MySQL client package that contains the NDB management client package:
sudo yum install mysql-cluster-community-server

Running the Cluster

You can run Cluster by hand or let the MCC deal with it. In any case, the start sequence is MGMT node(s), DATA node(s), SQL node(s) and API node(s). When running by hand, sequence of commands by host are like this:
 ndb_mgmd -f /home/user/ndb/config.ini --initial --configdir=/home/user/ndb/data --ndb-nodeid=49
There are many ways in which you can mix parameters, for example:
ndb_mgmd  --configdir=/home/user/ndb/data/ --config-file=/home/user/ndb/data/49/config.ini
and so on, depending on where DATADIR and config.ini are placed.

Use ndb_mgm client to confirm node is up as described above.

Then start DATA nodes on hosts 2 and 3:
ndbmtd --connect-string="nodeid=1;172.31.24.27" (Host#2)
ndbmtd --connect-string="nodeid=2;172.31.24.27" (Host#3)
Notice how DATA nodes refer to MGMT node internal IP address and represent themselves with node ID found in config.ini file. It is possible to use external IP too but internal one does not depend on DNS service.

Use ndb_mgm client to confirm nodes are up as described above.

Next we bootstrap MySQL server and start it:
mysqld --defaults-file=/home/user/ndb/data/my.cnf --initialize-insecure
mysqld --defaults-file=/home/user/ndb/data/my.cnf --ndb-connectstring=172.31.24.27
Since we are preparing test setup, doing this as root is acceptable. However, you will need a lot of SUDO's later.
GOTCHA: Normally, you would never never leave your MySQL setup unprotected! Please observe procedures noted in our manual and secure your installation:
  • Initialize the data directory by invoking mysqld with the --initialize to let server generate a random initial password for the root@localhost account.
  • On *nix systems, it is important to make sure that the database directories and files are owned by the mysql account so that the server has read and write access to them. To ensure this, start mysqld from the system root account and include the --user option like this:
    $ bin/mysqld --initialize --user=mysql
  • To add mysql user/group please use following commands (or addgroup, adduser depending on the Linux flavor):
    $ groupadd mysql
    $ useradd -r -g mysql -s /bin/false mysql
    Because the user is required only for ownership purposes, not login purposes, the useradd command uses the -r and -s /bin/false options to create a user that does not have login permissions to your server host. Omit these options if your useradd does not support them.

Use ndb_mgm or MCC to confirm Cluster is up and running:

GOTCHA: By default, MCC will set SharedGlobalMemory to 384MB which is too much for microinstance so DATA nodes might not start. Lower this value to 128MB or 256MB, whichever works for you. You can also change LockPagesInMainMemory=0 to LockPagesInMainMemory=1 to make this problem more visible.

config.ini: Assuming you let MCC create configuration and directories for you, ~/ndb/data becomes ~/MySQL_Cluster/NodeID
#
# Configuration file for ...
#

[NDB_MGMD DEFAULT]
ArbitrationRank=1
HeartbeatIntervalMgmdMgmd=1500
Portnumber=1186

[NDB_MGMD]
NodeId=49
HostName=172.31.24.27
DataDir=/home/user/MySQL_Cluster/49/
Portnumber=1186

[TCP DEFAULT]
SendBufferMemory=2M
ReceiveBufferMemory=2M

[NDBD DEFAULT]
NoOfReplicas=1
ServerPort=11860
CompressedLCP=false
LogLevelStartup=1
EventLogBufferSize=8K
DataMemory=4M
IndexMemory=2M
MinFreePct=5
MaxNoOfAttributes=1000
MaxNoOfTables=128
MaxNoOfOrderedIndexes=128
MaxNoOfTriggers=768
MaxNoOfConcurrentSubOperations=256
StringMemory=25
MaxAllocate=32M
Diskless=false
LockPagesInMainMemory=1
ODirect=false
Arbitration=Default
DiskPageBufferEntries=10
DiskPageBufferMemory=128M
MaxNoOfConcurrentTransactions=4096
MaxNoOfConcurrentOperations=131072
MaxNoOfConcurrentScans=256
FragmentLogFileSize=64M
NoOfFragmentLogFiles=4
InitFragmentLogFiles=SPARSE
RedoBuffer=32M
RedoOverCommitCounter=3
RedoOverCommitLimit=20
MaxNoOfExecutionThreads=2
StopOnError=0
CrashOnCorruptedTuple=true
StartFailRetryDelay=0
MaxStartFailRetries=3

[NDBD]
NodeId=1
HostName=172.31.22.116
DataDir=/home/user/MySQL_Cluster/1/

[NDBD]
NodeId=2
HostName=172.31.19.15
DataDir=/home/user/MySQL_Cluster/2/

[MYSQLD DEFAULT]
AutoReconnect=false
BatchByteSize=16K
BatchSize=256
MaxScanBatchSize=256K

[MYSQLD]
NodeId=53
HostName=172.31.21.152

[MYSQLD]
NodeId=54
HostName=172.31.22.129

[API]
NodeId=231
HostName=172.31.21.152

[API]
NodeId=232
HostName=172.31.22.129
I have removed a lot of options MCC sets in [NDBD DEFAULT] section but feel free to play with them.

my.cnf file for SQL node on host 4 looks like:
my.cnf
#
# Configuration file for ...
# Generated by mcc
#
[mysqld]
log-error=mysqld.53.err
datadir="/home/user/MySQL_Cluster/53/data"
tmpdir="/home/user/MySQL_Cluster/53/tmp"
basedir="/usr/sbin/"
port=3306
ndbcluster=on
ndb-nodeid=53
ndb-connectstring=172.31.24.27:1186,
socket="/home/user/MySQL_Cluster/53/mysql.socket"
and same for host 5 only replacing 53 with 54.
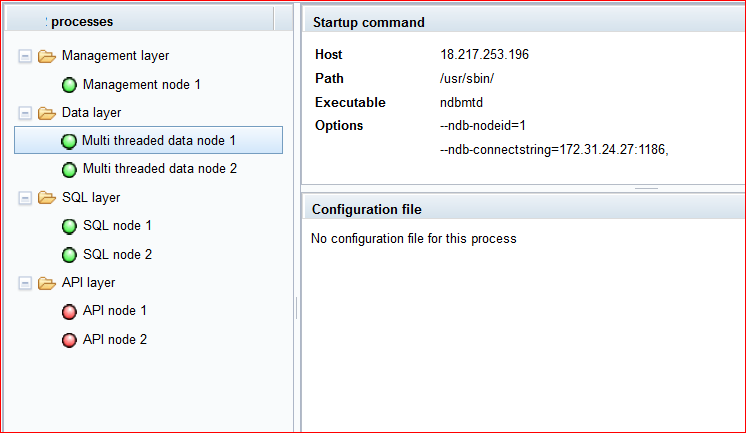
GOTCHA: Client programs (ndb_mgm and mysqladmin) do not reside in /usr/sbin/ on RHEL but rather in /usr/bin/ thus MCC now tries sbin, bin and checks if necessary client libs reside in PATH. What this means for you is that now you will be able to check status of Cluster and shut it down from within MCC. To check status you can also SSH to MGMT node host (#1) and use ndb_mgm as described above.

Stopping the Cluster

Either press "Stop Cluster" button in MCC or issue commands by hand in reverse order than the one you used for starting Cluster:
  • SSH to Host#4, issue (sudo) mysqladmin -uroot shutdown
  • SSH to Host#5, issue (sudo) mysqladmin -uroot shutdown
  • SSH to Host#1, issue (sudo) ndb_mgm --ndb-connectstring="172.31.24.27:1186", --execute=shutdown

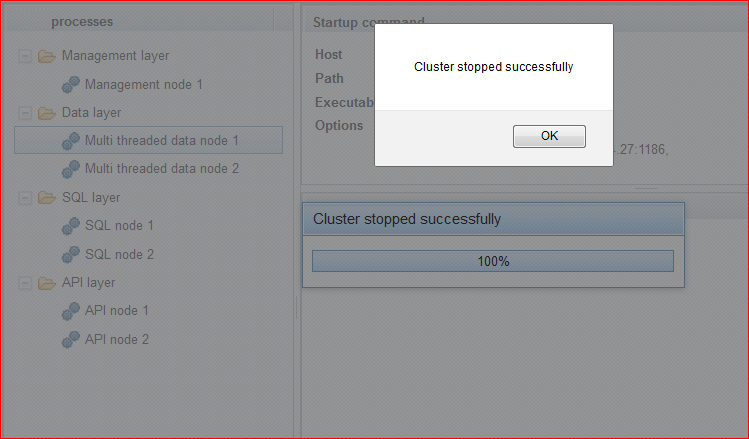
Result should be full cluster stop:


Summary

  • Stop any existing mysqld's and/or change the port for SQL nodes.
  • Open correct ports in firewall, set the authentication for your Cloud deployment.
  • ServerPort needs setting only in multi-host Cloud deployment. Beware that each DATA node residing on same host needs different value!
  • If necessary, update YUM, download tools such as wget.
  • Get MySQL repository, disable Server, enable Cluster.
  • Install MySQL software on hosts according to your topology.
  • Install MySQL Cluster software locally so you get /share/MCC.
  • Recreate topology in MCC using "Add Host" button, putting internal IP address and private key in proper place.
  • If using instances with very limited RAM, set SharedGlobalMemory to 128MB, set LockPagesInMainMemory to 1.
  • Deploy the configuration from MCC so you get all the directories created and configuration files distributed.


  • Next, I will talk of problems encountered, troubleshooting and Docker deployment.

    2018-02-05

    MySQL Cluster 7.6 includes new Cluster Configurator

    After dealing with Windows performance, I switched to MySQL Cluster Configurator (MCC for short) project. This was quite a change for me having to deal with Python back-end and JavaScript front-end, languages I was not so familiar with.

    For the history of the project, please refer to Andrew's blog post for I will concentrate on changes made in new version.

    There are many exciting new features in MySQL Cluster 7.6.4DMR including new MCC. To download MySQL Cluster 7.6.4DMR, please go to Development Releases tab. To see what's new in 7.6.4DMR, please follow this link.

    MySQL Cluster Configurator in short

    With a single command launch the web-based wizard which then steps you through configuring, deploying configuration and starting the cluster; to keep things even simpler, it will automatically detect the resources on your target machines and use these results together with the type of workload you specify in order to determine values for the key configuration parameters.
    The software is part of the MySQL Cluster package (NDB). To run on Windows, just double click setup.bat – note that if you installed from the MSI and didn’t change the install directory then this will be located somewhere like C:\Program Files...\MySQL\MySQL Cluster 7.6. On Linux, just run ndb_setup from the bin folder.
    On Windows, we provide all necessary libraries and the Python while on Linux, you should have Python 2.7 (latest) installed as well as Paramiko 2 or newer. Paramiko will install Cryptography and other required libraries.
    If you launch the installer from a desktop environment shell then the first page of the wizard will automatically open in your web browser, if not then just browse to the URL that is displayed on the command line.
    Recap: Start the Python web server from shell using setup.bat (Windows) or bin/ndb_setup (*nix), JavaScript front-end will be opened for you in default browser. If it's not, copy the link from console to your favorite browser. Make sure you have administrator rights on all the hosts you will use in cluster. Also, make sure to have MySQL Cluster installed on all the boxes making up cluster.
    There is an extensive help file in /hlp/html directory, please read if you're new to product.

    Who is this software for

    Typically, MCC would be used by developers working on Cluster software and people looking for quick evaluation of MySQL Cluster on various hardware configurations including cloud instances.

    New version highlights

    • Multiple reusable configurations. Take your configuration with you to work on different boxes.
    • Much safer configuration files allowing for saving passwords/passphrases resulting in full restoration of NDB Cluster from configuration file.
    • Many new options to configure both for NDB Cluster processes as well as for mysqld. Multiple choice options have proper drop-down lists associated.
    • Many new members in Cluster and Host objects. GUI changes to present them.
    • Nodes can have external IP address (to gain access from MCC for example) as well as internal IP address (for faster and safer communication inside cloud deployment or other VPN environment).
    • Extended ways of authentication such as using different username, private key on per host basis, using keys with passphrases and so on.
    • Better detection of running cluster processes and option to stop them even if startup fails.

    Language choice

    JavaScript was obvious choice since it's common to have GUI run in browser. Due to it's limitations (none likes browser sniffing around file system), we have back-end web server in Python handling various requests related to files, remote hosts etc. Front and back end communicate via POST messages so it is really important that you protect this communication. For a start, we provide self signed certificates for securing it. If you are testing things in sand-box, you may switch https for http to speed up things.
    Recap: Python back end manipulates encryption/decryption, files, connections to local/remote hosts and so on while JavaScript front-end provides GUI in your browser for convenient presentation of configuration options.

    Changes

    Changes in configuration files and authentication methods:

    First change tackled is the configuration. Versions shipped with previous Cluster releases had two major drawbacks; they kept configuration in cookies and could handle just one Cluster configuration which was locked to box where you created it. Keeping Cluster configuration in cookies comes with two major drawbacks; cookies are size-limited and very insecure.
    To remedy this situation, we opted for external configuration file saved in current user's HOME directory (this is done through Python web server that's running MCC); one configuration per file. The file itself is AES encrypted using passphrase provided in front-end and passed down to Python web server via POST message. Passphrase is then kept in memory for the duration of session. With provided passphrase and file name, Python server sends decrypted configuration back to front-end. Configuration is kept in global.windowname variable for the duration of the session.

    This has solved several issues:
    • Configuration now stores all your passwords, passphrases for keys and such allowing for quick and full recreation of Cluster.
    • Extending configuration size allows for per-host credentials. I.e. each host in Cluster can have it's own way of authentication and set of credentials.
    Essentially, when looking for quick and dirty deployment over hosts that use same credentials, it is enough to provide them on Page 2, Cluster Configuration. When working with hosts that have their own separate credentials, you can define them on Host level (Page 3, Add Hosts). We prefer adding hosts on Page 3 via Add Host button to defining them on Page 2 "Host list" box.
    Credentials can be:
    • Username/password.
    • Username/Key name.
    • Username/Key name/Passphrase.
    • Key name/Passphrase.
    • Key name.
    • Nothing.
    If PATH is not provided along with Key name, ~/.ssh is assumed. If using keys and no key name is provided, ~/.ssh/id_rsa is assumed. So, for authentication using standard private key without passphrase stored in default place, you just need to check "Key based SSH" (Page 2, Cluster level) or "Key-based auth" for particular host (Page 3, Add/Edit Host) checkbox and nothing more. If there are absolutely no credentials at host level, program behaves as in old versions meaning whatever was provided on Cluster level is used.

    WARNING: Although asynchronous, call to save configuration changes does take some time to complete. The saving of configuration takes place after pressing "Save&Next" button:

    No changes are saved if you close the tab or browser abruptly! After making extensive changes and pressing Save&Next I like to allow for some time for configuration to be saved. If you open debug console, you will see the notification.
    If you Cluster is all set up and ready to go and you just want to take one more look at various configuration options, you can use breadcrumb buttons as they do not trigger save method:

    Since all credentials are saved, you can skip looking into loaded configuration altogether and go directly to "Deploy configuration" page.
    Gotcha: In order to make configurations portable, we had to limit the usage of "localhost". If you include localhost in your Cluster, you will not be able to add any more remote hosts.
    Gotcha: List with available configurations is provided to front-end upon welcome page load so if you add more configurations to your HOME using external tools they will not be shown (unless you reload page or restart entire program). However, if you choose "New Configuration" and provide the name of existing one, the existing configuration will be loaded.
    Gotcha: "New Configuration" requires you to provide a passphrase and a confirmation. Reading existing configuration just requires passphrase. Please keep your passphrase(s) safe as there is no way to reverse engineer contents of configuration file without it! Each file/configuration can have it's own passphrase.
    Recap: There can be any number of portable, encrypted configurations now which you can find in your HOME on box running MCC. Each host can have it's own way of authentication and a set of credentials. We did our best to guess which auth method and credentials to use based on input provided.

    Changes in Cluster object (Page 2):

    Cluster object has two new attributes:
    • Install MySQL Cluster: Option for installing Cluster on hosts
      NONE: No installation of Cluster will take place (default).
      BOTH: Both DOCKER and installation from REPO will be considered depending on OS and available images. Should both installation mechanisms be available on certain host, we will prefer REPO over DOCKER.
      REPO: For every host in Cluster, the attempt will be made to install Cluster SW from the repository URL.
      DOCKER: For every host in Cluster, the attempt will be made to install Cluster SW DOCKER image.
    • Open FW ports: Check if you need the tool to try to open necessary ports for Cluster processes on every hosts.
    Gotcha: In this version "Install MySQL Cluster" is not functional so you need Cluster installed on all hosts beforehand.

    Changes in Host object and GUI (Page 3):

    Host object has undergone major rework. Host name is now used for external host IP address i.e. IP address at which MCC web server instance can reach that particular host. Host Internal IP refers to that particular host IP address inside VPN. If there is no VPN in play, both IP addresses are the same. We strongly encourage using IP addresses here to skip potential problems with resolving host names.
    Authentication, as per above, could be a) using keys or b) ordinary username/password. If you check Key-based auth when Adding/Editing host and provide nothing, ~/.ssh/id_rsa key will be used without passphrase. You can also define alternate user (to one starting MCC) which comes handy when logging in to domains. Each key can have passphrase and you can provide the path to and name of specific key to use for that host.
    If you check Configure installation, you will be presented with additional fields relating to repository and Docker image. We do our best to provide you with default values based on OS running on particular host you're Adding/Editing.

    We have also added Show/Hide extended host info toggle button switching between single and double line host info representation.

    Changes to Define parameters (Page 5):

    We are constantly adding more configurable parameters to keep up with MySQL server and Cluster evolution but this is a moving target so we ask for patience if certain parameter you'd like to configure is missing.
    In addition to many new configurable parameters, we have extended a GUI so that, for appropriate options, you get drop-down list of allowed values.

    Changes to Deploy configuration (Page 6, last):

    The Start and Stop Cluster buttons now behave more intelligently in terms of determining if the Cluster or any of its processes is running and enabling/disabling appropriate buttons.
    Previously, if Cluster was stuck in any of the startup phases, you had to terminate MCC and kill all the processes on all of the hosts manually. Now, if you think something is wrong, you can close the progress window and it will give control back to MCC enabling Stop Cluster button which you can then press to stop the stray processes properly. It will also provide you with list of log files which you can then check for problems.
    Stopping mysqld process(es) might not work if you changed the credentials from command line.


    These changes are available in version 7.6.4DMR and up. We encourage you to try MCC and MySQL Cluster in your environment!