Cloud setup
It might come as surprise but for initial testing any instance should do. I started with 1CPU/1GB RAM ones. The target topology was:- Host #1: Management node and Cluster client tools.
- Host #2: Multi-threaded DATA node.
- Host #3: Multi-threaded DATA node.
- Host #4: SQL node (MySQL server)/API node.
- Host #5: SQL node (MySQL server)/API node.

Cloud instances:
At your provider of choice, set up topology as described. Most of the providers prefer using keys so set the security and save the key to your local box. After that, set the firewall rules. Here is the list of ports with explanation for this example:
- Port#1186: Port used by management node for communication. It is also used by MCC to connect to Management node host and gather status from/shut down the Cluster. Open it on host #1.
- Port#11860: "ServerPort" used by DATA nodes to communicate with each other. Open it on hosts 2 and 3.
- Port#3306: Standard MySQL server port. You need to open it on hosts 4 and 5.
GOTCHA: Port 3306 on hosts 4 and 5 could already be taken by existing MySQL server installation which you might remove first or change this port to, say, 3316.
$ sudo netstat -tulpn | grep LISTEN
tcp        0      0 0.0.0.0:22              0.0.0.0:*               LISTEN      929/sshd
tcp        0      0 127.0.0.1:25            0.0.0.0:*               LISTEN      894/master
tcp6       0      0 :::3306                 :::*                    LISTEN      983/mysqld
tcp6       0      0 :::22                   :::*                    LISTEN      929/sshd
tcp6       0      0 ::1:25                  :::*                    LISTEN      894/master
$ sudo /sbin/service mysqld stop
Redirecting to /bin/systemctl stop mysqld.service
$ sudo netstat -tulpn | grep LISTEN
tcp        0      0 0.0.0.0:22              0.0.0.0:*               LISTEN      929/sshd
tcp        0      0 127.0.0.1:25            0.0.0.0:*               LISTEN      894/master
tcp6       0      0 :::22                   :::*                    LISTEN      929/sshd
tcp6       0      0 ::1:25                  :::*                    LISTEN      894/master
GOTCHA: Usually, MySQL Cluster DATA node will look for available port and auto-assign ServerPort. However, it is most likely that your Cloud firewall will block everything but specific ports so this value is needed.
If you have localhost deployment or you have two or more DATA nodes on same host, do not assign this value.
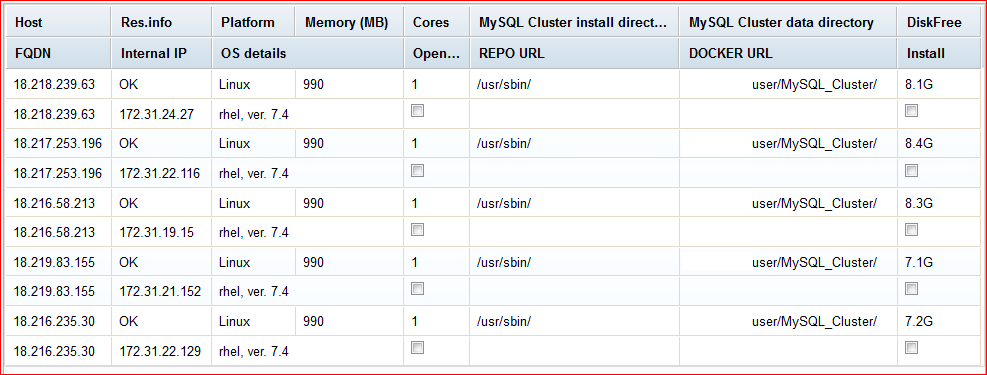
After dealing with security and choosing your preferred OS, make note of both public and private IP addresses. Public one we will use to control the processes from MCC while private ones will be used by processes for inter-communication bypassing DNS service:

NOTE: The "Open..." refers to "OpenFirewall" field of Host configuration.
Preparing the host(s)
If you're using MCC, you can configure all the processes and options and create directories/deploy configurations by clicking DEPLOY button on last page.If you want to do things by hand, please, in your HOME, prepare the directories:
mkdir ndb (or MySQL_Cluster)
cd ndb
mkdir data
cd ..Prepare the utilities:
sudo yum update
sudo yum install curl wget unzip zipwget https://dev.mysql.com/get/mysql57-community-release-el7-11.noarch.rpm
sudo rpm -ivh mysql57-community-release-el7-11.noarch.rpmrpm -qa | grep mysql mysql57-community-release-el7-11.noarchcat /etc/yum.repos.d/mysql-community.repo
[mysql57-community]
name=MySQL 5.7 Community Server
baseurl=http://repo.mysql.com/yum/mysql-5.7-community/el/7/$basearch/
enabled=1 <<<<< 0
gpgcheck=1
gpgkey=file:///etc/pki/rpm-gpg/RPM-GPG-KEY-mysql

[mysql-cluster-7.6-community]
name=MySQL Cluster 7.6 Community
baseurl=http://repo.mysql.com/yum/mysql-cluster-7.6-community/el/7/$basearch/
enabled=0 <<<<< 1
gpgcheck=1
gpgkey=file:///etc/pki/rpm-gpg/RPM-GPG-KEY-mysql
or by issuing:
sudo yum-config-manager --disable mysql57-community
sudo yum-config-manager --enable mysql-cluster-7.6-communitycat /etc/yum.repos.d/mysql-community.repo[mysql-connectors-community] ... [mysql57-community] name=MySQL 5.7 Community Server baseurl=http://repo.mysql.com/yum/mysql-5.7-community/el/7/$basearch/ enabled=0 gpgcheck=1 gpgkey=file:///etc/pki/rpm-gpg/RPM-GPG-KEY-mysql ... [mysql-cluster-7.6-community] name=MySQL Cluster 7.6 Community baseurl=http://repo.mysql.com/yum/mysql-cluster-7.6-community/el/7/$basearch/ enabled=1 gpgcheck=1 gpgkey=file:///etc/pki/rpm-gpg/RPM-GPG-KEY-mysqlInstalling Host#1 for the NDB management server is now easy:
sudo yum install mysql-cluster-community-management-server
sudo rpm -ivh http://dl.fedoraproject.org/pub/epel/7/x86_64/Packages/e/epel-release-7-11.noarch.rpm
sudo yum install mysql-cluster-community-client
ndb_mgm --ndb-connectstring=172.31.24.27:1186 ndb_mgm> show Cluster Configuration --------------------- [ndbd(NDB)] 2 node(s) id=1 (not connected, accepting connect from 172.31.22.116) id=2 (not connected, accepting connect from 172.31.19.15) [ndb_mgmd(MGM)] 1 node(s) id=49 @172.31.24.27 (mysql-5.7.18 ndb-7.6.3) ...Note: Perl is needed to install MySQL Cluster community package. To install Perl we need access to the EPEL packages.
Installing the NDB data nodes on Host#2 and #3 is also very easy:
sudo yum install mysql-cluster-community-data-nodeMySQL Cluster server package depends on Perl which is not part of a standard Red Hat installation. So on the Host#4 and #5 used for MySQL Server we first need to install support for Perl by installing EPEL packages (Extra Packages for Enterprise Linux) much like we did for MGMT node host (#1). This is performed through the command:
sudo rpm -ivh http://dl.fedoraproject.org/pub/epel/7/x86_64/Packages/e/epel-release-7-11.noarch.rpmAfter installing this, it is straightforward to install the MySQL Server package. This package will also download the MySQL client package that contains the NDB management client package:
sudo yum install mysql-cluster-community-server
Running the Cluster
You can run Cluster by hand or let the MCC deal with it. In any case, the start sequence is MGMT node(s), DATA node(s), SQL node(s) and API node(s). When running by hand, sequence of commands by host are like this: ndb_mgmd -f /home/user/ndb/config.ini --initial --configdir=/home/user/ndb/data --ndb-nodeid=49
ndb_mgmd --configdir=/home/user/ndb/data/ --config-file=/home/user/ndb/data/49/config.ini
Use ndb_mgm client to confirm node is up as described above.
Then start DATA nodes on hosts 2 and 3:
ndbmtd --connect-string="nodeid=1;172.31.24.27" (Host#2)
ndbmtd --connect-string="nodeid=2;172.31.24.27" (Host#3)
Use ndb_mgm client to confirm nodes are up as described above.
Next we bootstrap MySQL server and start it:
mysqld --defaults-file=/home/user/ndb/data/my.cnf --initialize-insecure
mysqld --defaults-file=/home/user/ndb/data/my.cnf --ndb-connectstring=172.31.24.27
GOTCHA: Normally, you would never never leave your MySQL setup unprotected! Please observe procedures noted in our manual and secure your installation:
- Initialize the data directory by invoking mysqld with the
--initializeto let server generate a random initial password for theroot@localhostaccount. - On *nix systems, it is important to make sure that the database directories and files are owned by the
mysqlaccount so that the server has read and write access to them. To ensure this, start mysqld from the systemrootaccount and include the--useroption like this:
$ bin/mysqld --initialize --user=mysql - To add
mysqluser/group please use following commands (oraddgroup, adduserdepending on the Linux flavor):
$ groupadd mysql
$ useradd -r -g mysql -s /bin/false mysql
Because the user is required only for ownership purposes, not login purposes, theuseraddcommand uses the-rand-s /bin/falseoptions to create a user that does not have login permissions to your server host. Omit these options if youruseradddoes not support them.
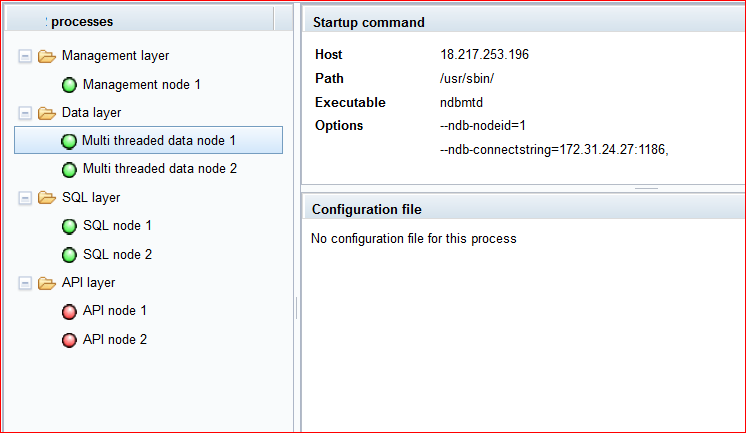
Use ndb_mgm or MCC to confirm Cluster is up and running:

GOTCHA: By default, MCC will set SharedGlobalMemory to 384MB which is too much for microinstance so DATA nodes might not start. Lower this value to 128MB or 256MB, whichever works for you. You can also change LockPagesInMainMemory=0 to LockPagesInMainMemory=1 to make this problem more visible.
config.ini: Assuming you let MCC create configuration and directories for you, ~/ndb/data becomes ~/MySQL_Cluster/NodeID
#
# Configuration file for ...
#

[NDB_MGMD DEFAULT]
ArbitrationRank=1
HeartbeatIntervalMgmdMgmd=1500
Portnumber=1186

[NDB_MGMD]
NodeId=49
HostName=172.31.24.27
DataDir=/home/user/MySQL_Cluster/49/
Portnumber=1186

[TCP DEFAULT]
SendBufferMemory=2M
ReceiveBufferMemory=2M

[NDBD DEFAULT]
NoOfReplicas=1
ServerPort=11860
CompressedLCP=false
LogLevelStartup=1
EventLogBufferSize=8K
DataMemory=4M
IndexMemory=2M
MinFreePct=5
MaxNoOfAttributes=1000
MaxNoOfTables=128
MaxNoOfOrderedIndexes=128
MaxNoOfTriggers=768
MaxNoOfConcurrentSubOperations=256
StringMemory=25
MaxAllocate=32M
Diskless=false
LockPagesInMainMemory=1
ODirect=false
Arbitration=Default
DiskPageBufferEntries=10
DiskPageBufferMemory=128M
MaxNoOfConcurrentTransactions=4096
MaxNoOfConcurrentOperations=131072
MaxNoOfConcurrentScans=256
FragmentLogFileSize=64M
NoOfFragmentLogFiles=4
InitFragmentLogFiles=SPARSE
RedoBuffer=32M
RedoOverCommitCounter=3
RedoOverCommitLimit=20
MaxNoOfExecutionThreads=2
StopOnError=0
CrashOnCorruptedTuple=true
StartFailRetryDelay=0
MaxStartFailRetries=3

[NDBD]
NodeId=1
HostName=172.31.22.116
DataDir=/home/user/MySQL_Cluster/1/

[NDBD]
NodeId=2
HostName=172.31.19.15
DataDir=/home/user/MySQL_Cluster/2/

[MYSQLD DEFAULT]
AutoReconnect=false
BatchByteSize=16K
BatchSize=256
MaxScanBatchSize=256K

[MYSQLD]
NodeId=53
HostName=172.31.21.152

[MYSQLD]
NodeId=54
HostName=172.31.22.129

[API]
NodeId=231
HostName=172.31.21.152

[API]
NodeId=232
HostName=172.31.22.129
my.cnf file for SQL node on host 4 looks like:
my.cnf
#
# Configuration file for ...
# Generated by mcc
#
[mysqld]
log-error=mysqld.53.err
datadir="/home/user/MySQL_Cluster/53/data"
tmpdir="/home/user/MySQL_Cluster/53/tmp"
basedir="/usr/sbin/"
port=3306
ndbcluster=on
ndb-nodeid=53
ndb-connectstring=172.31.24.27:1186,
socket="/home/user/MySQL_Cluster/53/mysql.socket"
GOTCHA: Client programs (ndb_mgm and mysqladmin) do not reside in /usr/sbin/ on RHEL but rather in /usr/bin/ thus MCC now tries sbin, bin and checks if necessary client libs reside in PATH. What this means for you is that now you will be able to check status of Cluster and shut it down from within MCC. To check status you can also SSH to MGMT node host (#1) and use ndb_mgm as described above.
Stopping the Cluster
Either press "Stop Cluster" button in MCC or issue commands by hand in reverse order than the one you used for starting Cluster:- SSH to Host#4, issue
(sudo) mysqladmin -uroot shutdown - SSH to Host#5, issue
(sudo) mysqladmin -uroot shutdown - SSH to Host#1, issue
(sudo) ndb_mgm --ndb-connectstring="172.31.24.27:1186", --execute=shutdown
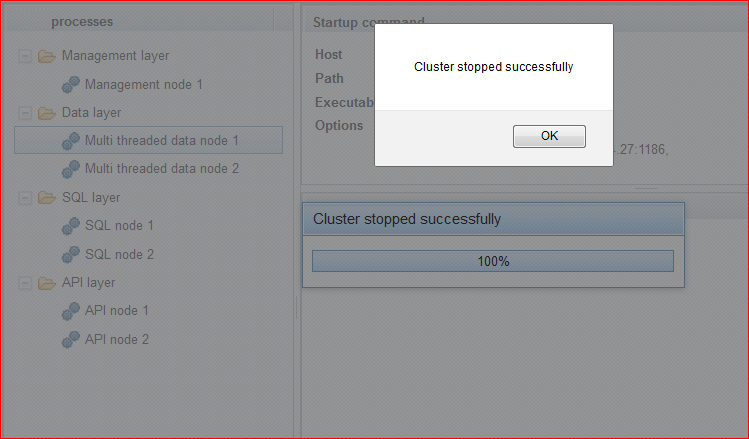
Result should be full cluster stop:

Summary
Next, I will talk of problems encountered, troubleshooting and Docker deployment.
No comments:
Post a Comment